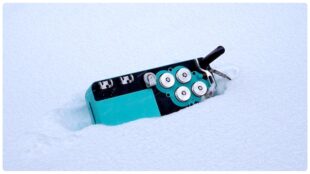
Interval training is increased intensity for a given activity (lifting, running, rowing, cycling) for a measured amount of time, followed by a reduced level activity for a measured amount of time. Typically done in sets, interval training can be anaerobic – fat burning high intensity interval training (HIIT) typically focused on starving larger muscle groups of oxygen – or aerobic, where low to moderate intensity is used for a longer period of time, allowing muscles to ‘breathe’ and build stamina.
Both anaerobic and aerobic exercise are beneficial and interval training is a great tool to realize those benefits, while at the same time adding a new dimension to workouts to keep them interesting.
Measuring intervals is easy, but too often it distracts you from your chosen exercise. I’ve been in all-out sprints with my left arm unnaturally poised in front of me so I could read my watch (with difficulty and added risk). Others rely on a partner’s shouts to let them know when to speed up, slow down or stop. A small device called the GymBoss (1 3/4 x 2 1/4 inches) is a lightweight, inexpensive ($20USD) and eliminates the need to focus on anything else but your workout. Clip it to your belt, stick it in your pocket or place it on a shelf for indoors workouts – it’s barely noticeable until a shrill beep, strong vibration or both effectively alert you (to be honest the first time it beeped it startled the hell out of me).
The GymBoss easily satisfies what I would consider my basic need for measuring intervals while running. Others use it to time rounds (up to 99 can be programmed) on the heavy bag or for cycling, weight lifting and other pursuits. Other GymBoss features include…
- One or two different time intervals from 2 seconds to 99 minutes
- Auto mode / repeat through intervals
- Manual mode / countdown timer
- Stopwatch
The manual is a small double-sided slip of paper they package under the belt clip. If you’re just getting started with interval training and want more information, check out some of these sites so the directions make more sense and you can program the GymBoss accordingly…
http://www.intervaltraining.net/
http://en.wikipedia.org/wiki/Interval_training
http://sportsmedicine.about.com/od/tipsandtricks/a/Intervals.htm
For $20USD you really can’t beat the GymBoss, it does everything it says it does and does it well.
Posted by: Lawrence
Not everyone needs an iPhone or even a smartphone for that matter. For many, the only functionality needed is good voice quality and the only feature required is reliability. Enter the Motorola Barrage, both uniquely feature-rich as well as durable and providing what I perceived to be above-average voice quality.
Ideally suited for those who work or play outdoors, the Barrage meets or exceeds military specifications for dust, shock and weather. In fact, the Barrage is waterproof in up to one meter of water and submerged for up to 30 minutes. I threw it in the snow, plopped it in a glass of water, took it to the beach and – the test of all tests – let my 6-year-old play with it. Beyond the tested toughness, the Barrage feels like a solid piece of tech, weighing 4.2 ounces and handsomely constructed using black textured rubber and plastic.
Offered by Verizon Wireless for $129.99 (with $50 online discount), the push-to-talk capable Barrage’s 383 minutes of talk-time competes for battery life with a host of features including a 2 megapixel camera (non-camera version also available), music player, bright external 120 x 160 display and TFT internal display (176 x 220).
VCAST and VZ Navigator service are available for additional monthly fees and the streaming in my area was admirable. In my opinion however, the screen size on flip phones in general renders services such as these to be more of a gimmick than useful.
If watching video on the go or you’re frequently going to use the navigation service, you’re better off with smartphone. If you’re the outdoorsy type, or even clumsy, the Motorola Barrage is your ideal phone. With quality construction, a host of features, Verizon’s unparalleled coverage and above-average voice quality, the Motorola Barrage is ready to go to work for you.
FLowTV
The commercial: Great montage of iconic moments captured on TV over the decades.
The product: FloTV, “a dedicated broadcast network of high quality video that emulates broadcast television.” FlowTV sells a 3.5″ touchscreen screen device with 5 hours of watch time and 4GB memory for $199.00 (for a limited time price includes 6 months of service) and $14.99/month thereafter.
iPhone and iTouch users can forgo the extra hardware and soon be able to add a Mophie Juice Pack (an external battery pack) with an embedded FloTV broadcast chip (reported to be available in the first half in 2010). Before purchasing FlowTV, check for coverage in your area.
See the ad here: http://www.youtube.com/watch?v=rKUUfPG8vx8
Vizio
The commercial: Futuristic warehouse where robots collect everything from Beyonce, the gopher from Caddy Shack to YouTube wonder-kid ‘David after Dentist’ and drop them into Vizio’s TRULED chip.
The product: Dubbed “The best of the internet now on your HDTV” this is an HDTV with built-in wireless (802.11n dual-band) and wired networking. Select Vizio models with this functionality will also includes a Bluetooth universal remote control with sliding QWERTY keyboard. Offering what is called the Vizio Internet Apps Platform, users can quickly connect to Flickr, Netflix, Twitter, Amazon, Yahoo and more.
See the ad here: http://www.youtube.com/watch?v=cHxmRSYDazE
Google
The commercial: Google’s “Parisian Love” ad not only demonstrates what their product is capable of… it demonstrates what it’s capable of! How to convince a French woman you’re a worldly, well read renaissance man by Googling everything you ought to know to get laid. OK, actually this is a heartwarming ad and even though it’s not new, Google was wise to run with it because it’s damn good.
The product: Google search (maybe you’ve heard of it?)
See the ad here: http://www.youtube.com/watch?v=nnsSUqgkDwU
Other technical products advertised during the Superbowl were Intel (yawn), EA (cool), Monster (funny!), GoDaddy (embarrassing) and E*trade (really, the baby… again?).
What were your favorite ads (techie or otherwise)? Leave them in the Comments below…
Posted by: Lawrence
Okay, it’s cold and dark and wet out there, if you’re living in the northern hemisphere and it’s what we call Winter time (not that bullshit they complain about in Florida when they have to put on a sweater or something). You don’t want to ride your bike, you don’t think it’s safe out there, you don’t want to get up early in the morning before the sun is up, and you have a hundred excuses to stay warm and cozy in bed. I get it. That’s me, too, on most days.
This is the toughest and possibly the most dangerous time of the year to fit those long rides in. But this is also exactly the time of year when you most need to fit in those long rides. You need to build aerobic endurance right now, so you have that strong base to build on later. That means keeping the intensity low and steady while building up the miles gradually until you are over-achieving your target race distances (maybe not for running, though, because of the higher impact and greater risk of injury) in your aerobic endurance heart rate/intensity zone.
If you are a triathlete, then cycling is probably the most time-consuming discipline to train for of the three, since it tends to be the most time-consuming discipline in any race – unless, for example, you are a really, really fast cyclist and a really, really slow runner. For your longer endurance sessions that probably form your key sessions each week, time spent on the bike can be as much as 2-3 times the time spent running and 5-6 times the time spent swimming. For example, if you are training for Iron-distance races, then you might want to build up to doing:
- about a 90-minute endurance session each week, gradually getting to the point where you can swim 4000 meters continuously;
- one long steady distance (LSD) run somewhere around 2-4 hours each week, where you can run about 20 miles steadily and continuously;
- one long ride of 8-10 hours each week. Yes, 8-10 hours. Build up to the point where you can cycle about 120 miles on a single ride. At aerobic endurance pace, that means you might not go much faster than 13-15mph.
Not starting right away, not proving how tough and macho you are, when yesterday you were doing 5-mile runs and 25-mile bike rides and tomorrow you’re going to tag along for a 20-mile run or a 100-mile ride. Building up to these steadily and gradually with about 10% increase in volume each week so that, come race season, you have slowly adapted to these longer distances and hopefully avoided injury or burn-out or both. But, you can see how the cycling part of that picture is the toughest to fit into a schedule that may already include work, sleep, a social life, and a significant other in your life who likes to spend time with you when you’re not snoring or wolfing down food in between training sessions.
So, Winter tends to be a time you need to get creative, add some variety, and find every possible way to get in the training on the bike. Here are a few tips that have been working for me, so far:
Get a turbo trainer
There are a few great things about turbo trainers:
- They don’t have to be outrageously expensive. The Minoura Mag 500, pictured left, is a very good entry-level trainer I bought on sale a few years ago, and I saw one on eBay the other day for less than $100.
- You attach your bike, via the skewers on the rear wheel, and spin away indoors, in the warmth, safety and comfort of your own home (or in the relative safety and comfort of the back garden, in my case) as long as you want, any time of the day or night.
- You get to spend more time on your own bike, adjusting and getting used to the set-up on your bike for optimum performance (e.g. so much easier to get the saddle position just right when you are using a turbo trainer). You can try new things out (like the first time you buy clipless pedals and need to practice clicking in and out, or the feeling of being on your new aero bars) on the turbo in relative safety before you take it out on the road.
- You can do interval sessions with pretty precise control in a way that you can’t always get on the open road. For example, if you are on the road in the middle of a 3-minute higher-intensity interval and you reach a busy intersection with a stop sign, then you have to stop, whether you’ve finished the interval or not. You won’t have that problem on a turbo trainer.
- You can do many technical exercises and drills on a turbo that you might not be able to do on your bike on the road, like single-leg exercises or hands-free exercises.

- Some people love to sit and spin on their turbo trainer for hours and hours, watching TV or listening to music. You can even buy some DVDs that connect to your turbo trainer in a cool sort of virtual reality kind of way (if you buy a pretty high-end one, like the Tacx Satori pictured above, right).
The down-sides of having a turbo trainer, that I’ve seen so far:
- I find them excruciatingly dull, in much the same way that I find running on a treadmill excruciatingly dull. I enjoy cycling and running because I enjoy getting out and about and seeing things, exploring places, even familiar places, at different times of the year. I can’t, for the life of me, find a way to spend more than 60 minutes on a turbo trainer without feeling like a hamster on one of those exercise wheels, going absolutely nowhere in pointless repetition.
- You won’t learn much in the way of bike handling skills on a turbo trainer. You may be getting very fit on the turbo and it may be a great way to tackle specific fitness development, but you won’t be learning anything about braking, cornering, ascending or descending on the bike. Triathletes already have enough handicaps in their bike-handling skills, especially if you are only doing non-drafting races or if you spend a lot of time on the aero-bars. We need to get out on the road and ride for real as much as we can to get those very important bike-handling skills.
- You will sweat like a pig in a steam room on the turbo. When you are cycling out on the road, the air rushing past you tends to dry you off as you sweat, most of the time. When you are cycling on the turbo, there is no air rushing past you since you are sitting still, and you are going to create an enormous pool of sweat beneath you very quickly. Even in the middle of January sitting out in your unheated back garden. So, put something under your body to catch all that sweat.
Go off-road
When snow and ice become an issue on the roads in the Winter, then think about going off-road. I bought that bike pictured above second-hand for less than $100, cleaned it up, changed all the cables and pads, plus a new chain and cassette, for a total of another $100 or so, and now I can ride all over the place, whatever the weather. London is not used to seeing much snow in the Winter-time and so it tends to freak people out here, but not me. For me, it means that the streets are less congested and I still get to cycle all over the place.
Here are the things that I like about riding my mountain bike at this time of year:
- It’s much heavier, clunkier and much less efficient than my road bike or my TT bike. Yes, I think that’s a good thing, because it makes my legs stronger. With the front and rear suspension on that monster, I estimate (with no scientific basis whatsoever) that every mile I ride on that bike is like riding 2 miles on my sleek, efficient TT bike.
- I can go places on that bike that I can’t go on my road bike. I can get out there and just have fun, go exploring and play in the mud.
- Off-road riding tends to give you much better bike handling skills in many areas than road riding does. Having to negotiate puddles, icy patches, trees, tree roots, ditches, leaves and all manner of fun obstacles is a great way to learn how to handle your bike. Come Spring-time, I will be much less scared of puddles, wet leaves, and unevenly paved corners on the road.
- I live near a part of London that is good for off-road riding (Hackney and Walthamstow Marshes along the Grand Union Canal is fairly flat but lots of little places to go off the beaten path and splash around), and not too far from some even better spots for off-road riding (all around Epping Forest). So, it’s easy for me, maybe not so easy for other city dwellers.
See and be seen
Be safe, be seen. Wear things that are bright and reflective, invest in some good lights, maybe a few lights that will help you see on a totally pitch black morning, but definitely some lights that will make people look at you and notice you. And make sure you have spare, fresh batteries for them.
Above is the Cateye Hybrid, which has a solar panel that claims to give you 6 hours of ride time (so that probably means 2 hours to you and me, in real practical terms) and batteries for up to 30 hours (claims like these usually fall short). I haven’t tried this one out, but I’d love to. I love the idea of anything that is solar-powered.
Above, you have the basic Cateye pair of lights for urban-noticeability. I like these because they have lots of blinking settings, they are a little bit bigger than other typical bike lights, and they can be set up either vertically or horizontally, which is kind of cool.
Another choice is the Exposure Joystick Maxx light, that comes with a helmet mount and handle-bar mount. I like the helmet mount because then I can use that light on any bike I ride (I have 3 right now) and don’t have to re-mount it on different handlebars if I use a different bike.
Stay warm and dry
- Gloves should be keeping your hands warm and dry, and have some padding specifically for cycling if you plan on being on the bike for a long ride.
- Tights should keep you warm and probably be bib tights like those shown above, so they don’t creep down while you are riding.
- Overshoes should keep your feet warm and dry, too.
It’s also a good idea to have a helmet cap to keep your head warm.
On very cold days, I will go as far as the wear under-gloves or a second pair of gloves under my winter gloves, as well as a face mask (or just tie a bandana around my face) to protect the one part of my body that is still exposed.
I once forgot to bring my overshoes on a long ride, so I stopped in at a shop and asked for two plastic shopping bags. Then, I took my feet out of my cycling shoes, put the bags around my feet and then put the shoes back on. Presto! A cheap way to keep the feet warm. They got very sweaty, looked ridiculous, were not very comfortable, but my feet sure stayed warm.
Sometimes the hard work is its own reward
Join a club, find a friend with similar goals to yours, or just somehow find a way to make a promise to someone else that you will do the ride, and then you may find it’s so much more difficult to change your mind and back out at the last minute. Try something new. Get out there and ride when you can.
Make a list of things you like about riding in the Winter and put the list next to your bed. When the alarm goes off and it is still dark and cold and you feel like rolling over and going back to sleep, read the list first. My list of what I like about riding in the Winter looks like this:
- I get to see the sun rise.
- I get to ride the streets when they are pretty quiet.
- I get to see things I normally wouldn’t get to see, like foxes, milkmen driving electric milk floats, and people wearing glittery party clothes as they stumble around the streets.
- I get to drink as much hot chocolate as I like and never once worry about calories or fat or sugar.
- I get to ride with some pretty cool people, chat with them for hours, and get to know them a little better. Sometimes I don’t feel like I am boring them to death with all my long-winded stories.
- The journey is the destination. I love being out there on my bike, any time of the year, and it is always better to be out there than to not be out there wishing I had done it.
Posted by: Robert
If you enjoy the outdoors all year long, even when it’s wet and cold, you have to prepare properly. When dressing for the winter leave the cotton at home – once wet it’s like a death blanket. Keep your head and neck covered and make sure you have adequate protection for your hands and feet (while allowing for proper blood flow). Make sure you bring a lot of carbs to stay fueled and don’t forget your body needs to stay hydrated – especially in winter.
OK Nanook, so you’re ready for a good time in the outdoors with friends and you need a reliable camera to capture those moments where you’re huddled over a fire looking like a ragged group of post apocalyptic survivors. Enter the Panasonic LUMIX DMC-TS2, a waterproof, freeze-proof and shockproof 14.1-megapixel camera also capable of recording HD video.

The LUMIX TS2 is a camera built for action. It’s waterproof to 33 feet /10m (1 atmosphere for you divers), shockproof to 10 feet (2m), freeze-proof to 14° F (-10° C) and dust-proof. The airtight body protects it against water immersion, dust and sand and rubber padding, reinforced glass (protecting the 2.7-inch, 230,000-dot Intelligent LCD) and carbon construction inside the camera further ruggedize the LUMIX TS2 that is also as smart as it is tough.
The LUMIX TS2 is not only tough, it’s also full of features that make it an excellent choice for any occasion. Some features of the LUMIX TS2 include…
- 28mm wide-angle LEICA DC VARIO ELMAR lens (4.6x optical zoom)
- Built-in LED light for lighting-up dark areas (such as underwater)
- Face detection (up to 15 faces)
- iA (Intelligent Auto) features such as Intelligent auto Resolution,Zoom, AF Tracking, ISO Control and Exposure
- Built-in Modes such as ‘Happy’ Mode (optimized color, saturation and brightness) for vivid photos or video and High Dynamic Mode for situations where a scene includes bright and dark areas
- Compatible with SDXC Memory Cards up to 64GB
- Rechargeable battery that takes up to 360 images on a single charge
Pricing and availability for the Panasonic LUMIX TS2 will be announced 30 days prior to shipping date (unannounced, but note that it’s predecessor, the LUMIX TS1 was priced around $380USD). The Panasonic LUMIX TS2 will be available in silver, blue, orange and yellow.
Posted by: Lawrence
For all you lucky recipients of an iPod Touch this holiday season, there’s a cool and useful accessory coming out later this year to keep an eye on. The XGPS300 iPod Touch GPS Cradle from Dual Electronics turns your iPod Touch into a fully-enabled GPS device. The XGPS300 includes a free turn-by-turn Navigation app NavAtlas, 0-90degree windshield mount and charging cable.
The XGPS300 is more than a GPS navigator, it is also a battery cradle and has an amplified speaker for real-time voice guided navigation. Check-out the video below for a quick demonstration of features and if you’re interested, request to be kept updated as to it’s availability. Expected price is $179USD.
Posted by: Lawrence
Every car I’ve owned has had a roof rack. Even my old pick-up truck had a bed rack to hold and lock my mountain bike (which cost more than the truck). For my latest rack I switched to a Yakima rack system and I’m happy I did.

Assuming I’d need a few hours for installation on my SUV, I skimmed the directions and dove right in. To start, I had some kind of brainchild and pre-assembled the Landing Pads by loosely fitting the nuts before sliding them into position in the the factory rails. This saved me any potential difficulty trying to line-up the bolts.
Next, I snapped the Control Towers into the Landing Pads, installed the Crossbars and tightened it all down – simple! Finally, I inserted the SKS Lock Cores and had the whole thing installed in under 30 minutes! My wife thought I gave up when I went back inside, so suffice it to say it was far easier to install than I expected (I worked at a ski shop for years and installed numerous square bar systems).
Two friends of mine have square bar racks from a competing manufacturer and recently asked me to help install them. The first rack we couldn’t figure out at all (to be fair we didn’t have directions, but I feel with the Yakima I could have figured it out). Eventually we caved and had a local bike shop do the install for $50. The other rack took ages to install (in a frigid driveway), but it was essential we got it done since we were all staying at his ski house in Vermont!

As far as attachments, I’ve been using the Yakima StrapThang for surfing and love it. This past holiday weekend we headed up North and I easily installed the FatCat 4 which comes with universal mounting hardware to fit most applications. I also liked the large button to open the rack – easy even in clunky mittens.
Unfortunately, I have to remove the StrapThang to accommodate the FatCat 4 (a combination of the shorter 48″ crossbar and to have room for a wider surfboard), but attachments install and remove easily so no biggie there. Yakima sells crossbars in 48″, 58″, 66″ and 78″ lengths and the general rule-of-thumb is a crossbar can go as wide as the side-view mirrors.
I had to forgo the cargo box I own for another rack system. I think newer cargo boxes can go on either system, but mine is old and cracking so it’s just as well. It was more than a little cramped in the SUV with the wife, kids and all the gear, but the skis and snowboard were up top, so only soft projectiles were possible!
If you’re looking for a rack system you’ll find two camps – round and square. Both are priced competitively, have long track records and offer a variety of options (fittings and attachments). I read somewhere round structures are stronger than square, but I’d recommend the Yakima system for ease-of-installation alone.
Posted by: Lawrence
Alright, for those of us in the northern hemisphere, or who are not doing much racing until May/June/July, etc., this is probably what you would call our Base period of training. Now is the time to focus on technique, endurance and conditioning work. In other words, going back to basics, polishing things up, learning from last year’s mistakes and vowing to get it right this year. So, start off slow and easy, get some expert advice, maybe some coaching or tuition and build your fitness on a solid foundation that will be broader, stronger and allow later fitness gains to go higher than before. [That's why it's good to think of it as Base period, by the way. Get it? A base to build on... a foundation...good.]
In the world of swimming, that means swimming drills, and swimming drills mean swimming toys. Here is a list of things I already have in my swim bag, and how they help my training. Swimming can be technical and complicated, many splendored thing. It’s more than just flailing up and down the lanes at the local pool – drop me a line at robert.popper@sky.com for advice.

Goggles
Okay, duh! You already knew you needed goggles to go swimming in the pool, but how many different makes and models have you tried? Do you go for the cheapest ones they sell at the pool? Do you go for the most expensive ones? Always try on different makes and models to see which ones suit your face and eye-sockets best. A swimming coach friend told me that a good way to gauge goggle fit is to press them into position over your eyes without the straps to see if they stay on your face.
I have tried dozens and dozens of pairs of goggles (and, yes, I have some that were the cheapest ones sold at the swimming pool!) and my favorites are the ones shown above, Aquasphere Kayenne with blue tinted lenses (because, quite frankly, the whole world just looks so much cooler when it’s all blue-tinted). I like a wider frame, but not too wide or mask-like and these offer a 180-degree view (considering that most of my swimming in Spring and Summer will be open water swimming), and I like the overall feel of the material (hypoallergenic Softeril®, so they tell me). I have also tried others that I like, such as the Aquasphere Seal XP (however it’s mask-like profile makes it better for open water than for swimming pools) and the Speedo Pacific Storm (one of my favorites at the less expensive end of the market for day-to-day swimming pool practice. Don’t discount the notion that putting something called Pacific Storm on your face might just make you the coolest kid in the pool) and remember, always carry an extra pair of goggles with you whenever you go swimming.
Water bottle
Yes, a water bottle. If you are going to be swimming for more than 20 minutes, you will probably get thirsty and should take little sips frequently during rest periods in between drills or intervals at the end of the lane. Even better than drinking water is a sports drink with some sugar and electrolytes to replace minerals and salts lost when you sweat. Yes, you sweat when you swim, you just don’t notice it as much. Any water bottle will do, as long as it is plastic and water-tight.
Swim cap
Wait a minute! I thought that this was supposed to be a cutting-edge, state-of-the-art web site about all the coolest sports gadgets and stuff! What’s all this about goggles, water bottles, swim caps, and low-tech, obvious nonsense? When do we get to the cool shit? Swim caps are just for girls, anyway, aren’t they?
Okay, why wear a swim cap when you’re swimming in the swimming pool? Hygiene? Sure, keep those loose hairs from clogging up the filters. Speed/hydrodynamics? Sure, shave 0.5 seconds off your next 50m sprint with a swim cap. How about the old adage that you should train as you mean to race?
Consider this scenario: It’s race day and you’re given a bright colored swim cap so the organizers can tell what wave you’re in and so the kayakers can see you from a distance (and fish your drowning ass out of the water if they need to, because you didn’t train well, positioned yourself too close to the front like a total macho idiot, went off too fast like a total newbie, and cramped up). You’re hot, sweaty and nervous in the transition area, just squeezed into your wetsuit on and have Body Glide or Palmer’s Cocoa Butter Body Oil (sooo much better than Body Glide in my opinion, as it’s affordable, smells nice and is made from vegetable oil and therefor totally wetsuit-friendly) all over your hands. You struggle to put on your swim cap which keeps slipping off, it feels uncomfortable and your head is hot. Because your not used to it! Had you spent the past several months swimming with a swim cap on every single time, then fitting the cap on your head would be second nature. You would get it positioned just right, be used to the feel and not think twice about it. Eliminate distractions, so when you look at the cold, dark water your prepared to deal with all those horror stories you’ve heard about open water mass swim starts.
Swim caps come in latex (the basic, normal ones), polyester (god-awful, ugly ones that are, apparently, easier to put on and take off and make you look like you are an Australian lifeguard who never finished high school), silicone (easier to get on and off, thicker and warmer than latex), and neoprene (even thicker, warmer and often have a chin strap to keep them firmly in place). I can’t possibly recommend any one manufacturer or model in any of those styles, but remember to always carry a spare whenever you go swimming.

Fins
Why use fins for swim training? Increased speed? Yes, but why is that important (other than being really cool when you motor up and down the lane, like, twice as fast as people swimming without fins on)? Three reasons:
- fins increase pressure on your lower legs and so help develop and strengthen those muscles more effectively than swimming without fins (which is also why you need to be careful about cramps and aches in your legs and feet if you are new to using fins)
- fins are more likely to force your feet into a streamlined and hydrodynamic position when you are kicking, which is especially useful for triathletes (whose feet don’t often get very extended when cycling and running, and are often likely to be inflexible down there)
- fins give you the extra speed and forward thrust you need to do slower technical drills, so that you are concentrating on the drill and not on the fact that you are sinking to the bottom of the pool.
Personally, I always swim drills with and without fins on, because I don’t want to get too reliant on the fins for extra propulsion, or the giddy feeling of speed you get when swimming with fins.
Sadly, I have no excuse to go out and buy a new pair of Aquasphere Alphafins, since I already have a perfectly serviceable pair and they will probably last me for years and years (honestly, what is going to wear out or break down on a pair of fins?). However, should my current fins get lost, stolen, or by some chance left behind in a foreign country, then I would go right out and get me another pair of Alphafins. They are made of foam so they float in the water (which is handy when putting them on in the pool) and they are much lighter than other types of fins (which is great for guys like me who sometimes end up carrying fins around in my back-pack all day long).
Kick board
Kick boards primarily help with kicking, especially for front crawl (although it has its uses with back stroke, as well). Take your arms out of the equation and kick from the hips and not from your knees (kicking from the knees just increases drag and resistance, slows you down and just tires you out faster). Use a shallow kick that is in line with the profile of your body in the water. Keep your body aligned, as if you were swimming through a tube in the water and you don’t want to kick outside that tube.
Using a kick board in front crawl training also helps ensure that one hand always stays at the front of the stroke, like when doing “catch-up” drills. Some people recommend using kick boards for any of the single-arm drills. I do all of the kick board-based drills with and without a kick board, because (like when swimming with fins) it can become a bit of a crutch and I always like to see what it feels like to swim drills with no toys whatsoever.
Sometimes you’ll find a kick board sitting around the side of the pool and sometimes you need to bring one of your own if you want to be sure you have one for your drills. They are all similar, but the best one I’ve tried is the Speedo Pullkick, which doubles up as a pull buoy and a kick board.

Pull buoy
Pull buoys help take your legs out of the equation, typically when swimming front crawl or back stroke. You should do this for a few different reasons:
- to put more emphasis on the arms, back and upper body movement in your stroke
- to see how your kick impacts the rest of your stroke (believe it or not, some triathletes I coach swim a little bit faster when they use a pull buoy and stop kicking, so that tells us right away what they need to work on) and especially in your upper body rotation
- to see how effectively you are using your core muscles in your swimming (one tell-tale sign of poor core engagement is when someone starts to “fish-tail” – legs swinging from side-to-side when using a pull buoy).
Another really useful drill to do with a larger pull buoy, a kick board, or something like the Pullkick mentioned above, is to tap the pull buoy with every stroke when swimming front crawl. This helps ensure that you have a good follow-through on each stroke and your hand finishes past your hips, rather than coming out of the water early. When you do this, though, make sure you rotate your shoulders and upper body to effect the extra reach you need to tap the pull buoy, rather than collapse in your mid-section or arch your back to reach down to touch the pull buoy.

Paddles
Paddles are typically used for increasing power and upper body strength when swimming, sort of like fins do for the lower body. People new to paddles should start with the smallest size and work their way up to larger sizes. Be careful to avoid strains or shoulder injuries, stop if you feel any acute pain and take the paddles off.
Paddles are very useful for improving technique in a few different ways:
- Strap just your middle finger into the paddle and not your wrist or other fingers (depending on which paddle you use, they have different strap configurations on them) when doing front crawl. This encourages you to keep your hand straight as it comes out of the water at the end of the stroke, as well as finish the stroke all the way through past your hips instead of coming out of the water too early (similar to the touch-the-pull-buoy drill mentioned above), otherwise you’ll feel the paddle pull away from your hand and might even lose it in the water if it is not straight.
- Do some sculling and catch drills with paddles on to increase the resistance to the water. Then take the paddles off and see how much more sensitive your hands are in feeling the water at the front of the stroke!
- Do some sculling drills with paddles on, but not strapped to your hands. See if you can keep the paddles on your hands using the pressure of the water and a smooth, continuous hand movement.
- Do single-arm drills with paddles on to heighten your awareness of how each individual hand moves through the water, and how that effects your catch, pull and upper body rotation.
Some pools may not allow you to use paddles, because it’s supposedly too dangerous when swimming close to other people (apparently it’s not too dangerous when a drowning-coughing-spluttering man does his impossibly slow breast stroke then slaps and kicks you whenever swimming past). So alternatively, consider swimming gloves, which are made of soft neoprene and provide similar resistance to paddles (but not the fun versatility to do some of the drills recommended above).
So, these are the basic toys that a swimmer will need to do a good range of swimming drills and build a solid foundation. You don’t need to use all the toys every time you go swimming or do drills, but they will all come in handy at some point.
A few other toys that I don’t have in my bag, but have been recommended to me as being useful and/or fun:
Snorkel: A center-line snorkel, rather than one that goes to either side, which allows you to keep your head in the water the whole time and focus on things like arm movement, upper body rotation, hip movement, leg movement, or pretty much anything other than turning your head to breathe.
Hip rotation devices: There are a few different toys out there that will put more emphasis on getting good hip rotation, which is an extension of good upper body rotation, good core strength and engagement, and good overall streamlining in the water. Finis’ Tech Toc sounds like the coolest of the bunch with these devices.
PowerBreathers: There are other brands out there, other than PowerBreathe, but these guys pretty much dominate the swimming scene. They make a bunch of different types of products, but the idea is that they help you expand and strengthen the capacity of your diaphragm (not, as many believe, strengthen your lungs, which you do through aerobic exercise, not through breathing into one of these things). Developing your diaphragm improves your ability to inhale and exhale with greater power and efficiency. Some of my friends swear by them and have seen dramatic results with regular practice in a matter of weeks.
Swim-specific Heart Rate Monitor: Most heart rate monitors will not give accurate readings under water, since the contact with the chest strap or the wrist pulse can be unreliable (some say that they work pretty well under wetsuits in open water, but personally I have never had reliable readings). Finis is one of the first companies I know of that offer a swim-specific HRM.
Posted by: Robert
Using built in sensors, the Fitbit captures ‘three dimensional motion’ to provide insight as to the amount of activity and sleep you log each day. It compiles this data and based on your sex, height, weight and age calculates daily the amount of steps taken (reported to be 85-97% accurate), miles traveled, calories burned, calories consumed as well as activity levels (lightly, fairly and very active).

The Fitbit also captures sleep patterns such as when you went to bed, how long you rolled around awake, when you finally crashed and when you woke giving you total time in bed and total hours slept.
Walk within 15ft of the provided basestation and your data is automatically uploaded to the Fitbit website. The website compiles that data for reporting, or to participate in collaborative fitness goals with friends, family and co-workers.
Optimized for walking, running and general activity (don’t try to swim with it), the Fitbit provides a good indication of daily patterns and overall wellness. Priced at $99USD and shipping only in the US, the Fitbit might be the perfect holiday gift for the friend or family member resolved to get in shape for the coming year!
Posted by: Lawrence
To non-surfers, the Northeast seems an unlikely place to find good waves. It’s not California, not Hawaii and too cold most of year to get in the water… right? It seems a well kept secret that waves here in the Northeast are sometimes great and with the right gear it’s never too cold!
The only time cold-water surfing hurts is when it comes time to get out of the water and strap the boards on the roof. I’ve dropped my fair share of F-bombs when my fingers and face froze while fumbling to get my fish fastened (fins forward friends).
This year a revelation – the Yakima StrapThang which retails for about $70. Now cold-weather surfers everywhere can quickly and securely fasten up to 2 boards (or a board bag) with two quick pulls on bungee cords that hook over special bar-ends (part of the StrapThang package). The time from ocean, to car, to shower (still in your suit mind you) has never been quicker or easier.
I use the Yakima StrapThang in the warmer months too. While my friends are busy weaving straps and fastening buckles, I’m out of my suit and hitting Joyce’s for an early pint, or grabbing some breakfast at the Ocean Mist after dawn patrol. It’s also the quickest way to get in the water too, with no knots or buckles to undo you can simply release the cords, grab the board and go.
The StrapThang probably works with other rack systems, but you need the included hooked bar-ends which are made for the Yakima system. These ensure that the bungees don’t release unexpectedly and your board goes sailing. The StrapThang should also be used with crossbar pads, Yakima sells theirs for about $30.
The loops on the StrapThang are the right size for bare fingers, but not quite big enough for gloves (at least not over 5mm), so you may want to add some cordage as I did to make a larger loop that’s easier to grab.
If you are looking for a reliable rack system for surfing you need to check out the Yakima StrapThang. Surf more, freeze less.
Posted by: Lawrence


Recent Comments