Reading Time: 10 minutes

Alright, for those of us in the northern hemisphere, or who are not doing much racing until May/June/July, etc., this is probably what you would call our Base period of training. Now is the time to focus on technique, endurance and conditioning work.  In other words, going back to basics, polishing things up, learning from last year’s mistakes and vowing to get it right this year. So, start off slow and easy, get some expert advice, maybe some coaching or tuition and build your fitness on a solid foundation that will be broader, stronger and allow later fitness gains to go higher than before. [That’s why it’s good to think of it as Base period, by the way.  Get it? A base to build on… a foundation…good.]

In the world of swimming, that means swimming drills, and swimming drills mean swimming toys.  Here is a list of things I already have in my swim bag, and how they help my training. Swimming can be technical and complicated, many splendored thing. It’s more than just flailing up and down the lanes at the local pool – drop me a line at robert.popper@sky.com for advice.
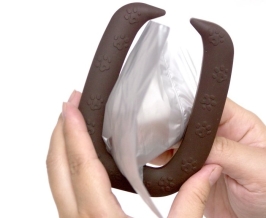
Aquasphere Kayenne goggles

Goggles
Okay, duh!  You already knew you needed goggles to go swimming in the pool, but how many different makes and models have you tried?  Do you go for the cheapest ones they sell at the pool? Do you go for the most expensive ones?  Always try on different makes and models to see which ones suit your face and eye-sockets best. A swimming coach friend told me that a good way to gauge goggle fit is to press them into position over your eyes without the straps to see if they stay on your face.

I have tried dozens and dozens of pairs of goggles (and, yes, I have some that were the cheapest ones sold at the swimming pool!) and my favorites are the ones shown above, Aquasphere Kayenne with blue tinted lenses (because, quite frankly, the whole world just looks so much cooler when it’s all blue-tinted). I like a wider frame, but not too wide or mask-like and these offer a 180-degree view (considering that most of my swimming in Spring and Summer will be open water swimming), and I like the overall feel of the material (hypoallergenic Softeril®, so they tell me). I have also tried others that I like, such as the Aquasphere Seal XP (however it’s mask-like profile makes it better for open water than for swimming pools) and the Speedo Pacific Storm (one of my favorites at the less expensive end of the market for day-to-day swimming pool practice. Don’t discount the notion that putting something called Pacific Storm on your face might just make you the coolest kid in the pool) and remember, always carry an extra pair of goggles with you whenever you go swimming.

Water bottle
Yes, a water bottle. If you are going to be swimming for more than 20 minutes, you will probably get thirsty and should take little sips frequently during rest periods in between drills or intervals at the end of the lane. Even better than drinking water is a sports drink with some sugar and electrolytes to replace minerals and salts lost when you sweat. Yes, you sweat when you swim, you just don’t notice it as much.  Any water bottle will do, as long as it is plastic and water-tight.

Swim cap
Wait a minute! I thought that this was supposed to be a cutting-edge, state-of-the-art web site about all the coolest sports gadgets and stuff! What’s all this about goggles, water bottles, swim caps, and low-tech, obvious nonsense? When do we get to the cool shit?  Swim caps are just for girls, anyway, aren’t they?

Okay, why wear a swim cap when you’re swimming in the swimming pool? Hygiene? Sure, keep those loose hairs from clogging up the filters. Speed/hydrodynamics? Sure, shave 0.5 seconds off your next 50m sprint with a swim cap.  How about the old adage that you should train as you mean to race?

Consider this scenario: It’s race day and you’re given a bright colored swim cap so the organizers can tell what wave you’re in and so the kayakers can see you from a distance (and fish your drowning ass out of the water if they need to, because you didn’t train well, positioned yourself too close to the front like a total macho idiot, went off too fast like a total newbie, and cramped up). You’re hot, sweaty and nervous in the transition area, just squeezed into your wetsuit on and have Body Glide or Palmer’s Cocoa Butter Body Oil (sooo much better than Body Glide in my opinion, as it’s affordable, smells nice and is made from vegetable oil and therefor totally wetsuit-friendly) all over your hands. You struggle to put on your swim cap which keeps slipping off, it feels uncomfortable and your head is hot. Because your not used to it! Had you spent the past several months swimming with a swim cap on every single time, then fitting the cap on your head would be second nature. You would get it positioned just right, be used to the feel and not think twice about it. Eliminate distractions, so when you look at the cold, dark water your prepared to deal with all those horror stories you’ve heard about open water mass swim starts.

Swim caps come in latex (the basic, normal ones), polyester (god-awful, ugly ones that are, apparently, easier to put on and take off and make you look like you are an Australian lifeguard who never finished high school), silicone (easier to get on and off, thicker and warmer than latex), and neoprene (even thicker, warmer and often have a chin strap to keep them firmly in place). I can’t possibly recommend any one manufacturer or model in any of those styles, but remember to always carry a spare whenever you go swimming.

Aquasphere Alphafins totally rock

Fins
Why use fins for swim training?  Increased speed? Yes, but why is that important (other than being really cool when you motor up and down the lane, like, twice as fast as people swimming without fins on)?  Three reasons:

  • fins increase pressure on your lower legs and so help develop and strengthen those muscles more effectively than swimming without fins (which is also why you need to be careful about cramps and aches in your legs and feet if you are new to using fins)
  • fins are more likely to force your feet into a streamlined and hydrodynamic position when you are kicking, which is especially useful for triathletes (whose feet don’t often get very extended when cycling and running, and are often likely to be inflexible down there)
  • fins give you the extra speed and forward thrust you need to do slower technical drills, so that you are concentrating on the drill and not on the fact that you are sinking to the bottom of the pool.

Personally, I always swim drills with and without fins on, because I don’t want to get too reliant on the fins for extra propulsion, or the giddy feeling of speed you get when swimming with fins.

Sadly, I have no excuse to go out and buy a new pair of Aquasphere Alphafins, since I already have a perfectly serviceable pair and they will probably last me for years and years (honestly, what is going to wear out or break down on a pair of fins?). However, should my current fins get lost, stolen, or by some chance left behind in a foreign country, then I would go right out and get me another pair of Alphafins.  They are made of foam so they float in the water (which is handy when putting them on in the pool) and they are much lighter than other types of fins (which is great for guys like me who sometimes end up carrying fins around in my back-pack all day long).

Kick board
Kick boards primarily help with kicking, especially for front crawl (although it has its uses with back stroke, as well). Take your arms out of the equation and kick from the hips and not from your knees (kicking from the knees just increases drag and resistance, slows you down and just tires you out faster). Use a shallow kick that is in line with the profile of your body in the water. Keep your body aligned, as if you were swimming through a tube in the water and you don’t want to kick outside that tube.

Using a kick board in front crawl training also helps ensure that one hand always stays at the front of the stroke, like when doing “catch-up” drills. Some people recommend using kick boards for any of the single-arm drills. I do all of the kick board-based drills with and without a kick board, because (like when swimming with fins) it can become a bit of a crutch and I always like to see what it feels like to swim drills with no toys whatsoever.

Sometimes you’ll find a kick board sitting around the side of the pool and sometimes you need to bring one of your own if you want to be sure you have one for your drills. They are all similar, but the best one I’ve tried is the Speedo Pullkick, which doubles up as a pull buoy and a kick board.

Speedo Pullkick doubles up as a kick board and pull buoy

Pull buoy
Pull buoys help take your legs out of the equation, typically when swimming front crawl or back stroke.  You should do this for a few different reasons:

  • to put more emphasis on the arms, back and upper body movement in your stroke
  • to see how your kick impacts the rest of your stroke (believe it or not, some triathletes I coach swim a little bit faster when they use a pull buoy and stop kicking, so that tells us right away what they need to work on) and especially in your upper body rotation
  • to see how effectively you are using your core muscles in your swimming (one tell-tale sign of poor core engagement is when someone starts to “fish-tail” – legs swinging from side-to-side when using a pull buoy).

Another really useful drill to do with a larger pull buoy, a kick board, or something like the Pullkick mentioned above, is to tap the pull buoy with every stroke when swimming front crawl. This helps ensure that you have a good follow-through on each stroke and your hand finishes past your hips, rather than coming out of the water early. When you do this, though, make sure you rotate your shoulders and upper body to effect the extra reach you need to tap the pull buoy, rather than collapse in your mid-section or arch your back to reach down to touch the pull buoy.

Speedo Tech paddle, comes in small, medium and large

Paddles
Paddles are typically used for increasing power and upper body strength when swimming, sort of like fins do for the lower body. People new to paddles should start with the smallest size and work their way up to larger sizes. Be careful to avoid strains or shoulder injuries, stop if you feel any acute pain and take the paddles off.

Paddles are very useful for improving technique in a few different ways:

  • Strap just your middle finger into the paddle and not your wrist or other fingers (depending on which paddle you use, they have different strap configurations on them) when doing front crawl. This encourages you to keep your hand straight as it comes out of the water at the end of the stroke, as well as finish the stroke all the way through past your hips instead of coming out of the water too early (similar to the touch-the-pull-buoy drill mentioned above), otherwise you’ll feel the paddle pull away from your hand and might even lose it in the water if it is not straight.
  • Do some sculling and catch drills with paddles on to increase the resistance to the water. Then take the paddles off and see how much more sensitive your hands are in feeling the water at the front of the stroke!
  • Do some sculling drills with paddles on, but not strapped to your hands. See if you can keep the paddles on your hands using the pressure of the water and a smooth, continuous hand movement.
  • Do single-arm drills with paddles on to heighten your awareness of how each individual hand moves through the water, and how that effects your catch, pull and upper body rotation.

Some pools may not allow you to use paddles, because it’s supposedly too dangerous when swimming close to other people (apparently it’s not too dangerous when a drowning-coughing-spluttering man does his impossibly slow breast stroke then slaps and kicks you whenever swimming past). So alternatively, consider swimming gloves, which are made of soft neoprene and provide similar resistance to paddles (but not the fun versatility to do some of the drills recommended above).

So, these are the basic toys that a swimmer will need to do a good range of swimming drills and build a solid foundation. You don’t need to use all the toys every time you go swimming or do drills, but they will all come in handy at some point.

A few other toys that I don’t have in my bag, but have been recommended to me as being useful and/or fun:

Snorkel: A center-line snorkel, rather than one that goes to either side, which allows you to keep your head in the water the whole time and focus on things like arm movement, upper body rotation, hip movement, leg movement, or pretty much anything other than turning your head to breathe.

Hip rotation devices: There are a few different toys out there that will put more emphasis on getting good hip rotation, which is an extension of good upper body rotation, good core strength and engagement, and good overall streamlining in the water. Finis’ Tech Toc sounds like the coolest of the bunch with these devices.

PowerBreathers: There are other brands out there, other than PowerBreathe, but these guys pretty much dominate the swimming scene. They make a bunch of different types of products, but the idea is that they help you expand and strengthen the capacity of your diaphragm (not, as many believe, strengthen your lungs, which you do through aerobic exercise, not through breathing into one of these things). Developing your diaphragm improves your ability to inhale and exhale with greater power and efficiency.  Some of my friends swear by them and have seen dramatic results with regular practice in a matter of weeks.

Swim-specific Heart Rate Monitor: Most heart rate monitors will not give accurate readings under water, since the contact with the chest strap or the wrist pulse can be unreliable (some say that they work pretty well under wetsuits in open water, but personally I have never had reliable readings). Finis is one of the first companies I know of that offer a swim-specific HRM.

Posted by: Robert

Reading Time: < 1 minute

Using built in sensors, the Fitbit captures ‘three dimensional motion’ to provide insight as to the amount of activity and sleep you log each day. It compiles this data and based on your sex, height, weight and age calculates daily the amount of steps taken (reported to be 85-97% accurate), miles traveled, calories burned, calories consumed as well as activity levels (lightly, fairly and very active).

Fitbit

The Fitbit also captures sleep patterns such as when you went to bed, how long you rolled around awake, when you finally crashed and when you woke giving you total time in bed and total hours slept.

Walk within 15ft of the provided basestation and your data is automatically uploaded to the Fitbit website. The website compiles that data for reporting, or to participate in collaborative fitness goals with friends, family and co-workers.

Optimized for walking, running and general activity (don’t try to swim with it), the Fitbit provides a good indication of daily patterns and overall wellness. Priced at $99USD and shipping only in the US, the Fitbit might be the perfect holiday gift for the friend or family member resolved to get in shape for the coming year!

Posted by: Lawrence

Reading Time: 2 minutes

To non-surfers, the Northeast seems an unlikely place to find good waves. It’s not California, not Hawaii and too cold most of year to get in the water… right? It seems a well kept secret that waves here in the Northeast are sometimes great and with the right gear it’s never too cold!

The only time cold-water surfing hurts is when it comes time to get out of the water and strap the boards on the roof. I’ve dropped my fair share of F-bombs when my fingers and face froze while fumbling to get my fish fastened (fins forward friends).

This year a revelation – the Yakima StrapThang which retails for about $70. Now cold-weather surfers everywhere can quickly and securely fasten up to 2 boards (or a board bag) with two quick pulls on bungee cords that hook over special bar-ends (part of the StrapThang package). The time from ocean, to car, to shower (still in your suit mind you) has never been quicker or easier.

I use the Yakima StrapThang in the warmer months too. While my friends are busy weaving straps and fastening buckles, I’m out of my suit and hitting Joyce’s for an early pint, or grabbing some breakfast at the Ocean Mist after dawn patrol. It’s also the quickest way to get in the water too, with no knots or buckles to undo you can simply release the cords, grab the board and go.

The StrapThang probably works with other rack systems, but you need the included hooked bar-ends which are made for the Yakima system. These ensure that the bungees don’t release unexpectedly and your board goes sailing. The StrapThang should also be used with crossbar pads, Yakima sells theirs for about $30.

The loops on the StrapThang are the right size for bare fingers, but not quite big enough for gloves (at least not over 5mm), so you may want to add some cordage as I did to make a larger loop that’s easier to grab.

If you are looking for a reliable rack system for surfing you need to check out the Yakima StrapThang. Surf more, freeze less.

Posted by: Lawrence

Reading Time: < 1 minute

Here in the Northeast we were just blessed with great surf for the past 4-5 days. I was fortunate enough to make it out for 3 of these days and loved every minute of it… almost.

One of the most frustrating parts of surfing is after earning your wave in a lineup, dropping in and realizing when you pop-up to stand, your feet are tangled in the leash. Called ‘hog-tying,’ this is not only frustrating, it can also be dangerous since your realization often begins when you are coming down the face of the wave.

A few weeks ago I talked with local surf legend Peter Pan who swears by a leash called the XM Tangle Free leash. The concept for this leash is so simple, a small sliding weight on the cord creates just enough drag to keep it shaped and behind the rider, thus preventing it from sneaking up and hog-tying your feet.

Recalling my conversation with Pan I headed to his surf shop Gansett Juice and picked up the 9′ XM Comp leash. This leash has a .220 diameter cord Double Swivel Comp with Slider (the regular XM Tangle Free has a .270 cord). Now I don’t get tangled every session, but I do feel the leash around both feet every session and I have to say with the XM Tangle Free leash I never felt the leash around both feet. Not even once.

Check out the video below to see the leash in action and if you surf and have ever been hog-tied, think about buying the XM Tangle Free leash. Even if you already own a leash, it’s always best to have one on stand-by in the event yours breaks mid-session in epic conditions!

Posted by: Lawrence

Reading Time: 2 minutes

Over my lifetime I’ve done perhaps hundreds-of-thousands of pushups, usually as a form of punishment for poor performance in karate and sports. I still hear my coaches screaming ‘drop and give me 30!‘ and it always puts me in a cold sweat. In the military if you screw-up you have to do pushups in a muddy puddle during a rain storm (it’s true, I saw it in a movie).

Considering that pushups are commonly used as a form of punishment, why would someone want to do pushups? Done properly they’re in an excellent form of exercise. Pushups work a variety of muscle groups (pectorals, triceps, deltoids and the midsection in general), build strength as well as stamina. Pushups also require little space, cost nothing and generally take little time to perform for maximum benefit.

The Perfect Pushup improves the effectiveness of traditional pushups while at the same time reduces strain on your wrists. With the Perfect Pushup, your arms naturally rotate 90° through the pushup, simultaneously engaging more muscles from your shoulders to your abs. This motion is far more comfortable than traditional pushups and more efficient. By changing positions (knees, traditional and feet on a chair), changing the width (distance between the perfect pushups from close to wide) and changing starting grip positions (thus changing rotation through the pushup) you can add variety to your workout.

When I tested the Perfect Pushup my max dropped in half compared to traditional pushups, but the workout itself felt more beneficial. I felt other muscles working that I don’t normally feel with traditional pushups. I also liked being slightly elevated in the front as it allowed me to bring my face closer to parallel with my face without kissing the ground.

For it’s small size, durable construction and low price, the Perfect Pushup is a must have for home gym owners. Also check out the portable version which is handy for travel. Now drop and give me 30 15!

Posted by: Lawrence

Reading Time: 3 minutes

Last weekend I participated in the inaugural “Druid Challenge” ultramarathon, along the Ridgeway, a beautiful, tough trail, just to the northwest of London.  I did it because:

(a) I wanted to get motivated to do some long-distance running as I train to tackle my first Ironman this year

(b) I wanted do a small event that was likely to be filled with camaraderie and collegiality more than competitiveness and PBs

(c) It seemed like a really interesting, well organised event that was amazing value for money – £90 (around $150) for 3 days of running, transportation, food,  accommodation and support.

It satisfied on all 3 points. I learned a lot about long-distance running, my strengths, my weaknesses and how to be better prepare for similar challenges in the future.  I also learned some valuable lessons about running kit, such as:

– Get the right shoes for the right conditions. I ran with Adidas Kanadia TR2 trail-running shoes and they were the right combination of lightweight shoes with some grip for the slippery trails.  And then wear them, train in them and get used to them. I probably should have gone more out of my way to run through puddles and clomp around the mud, running up and down hills than I did before the race.

– Get a good bag that fits you well and holds what you need. I ran with the Inov-8 Race Elite 15, which turned out to be just right for this event. I was tempted to go for a larger pack that could hold more, but it would have been too much for this race, which was well-supported with aid stations on average once every 8 miles. As it was, I probably carried way too much, but was also quite glad to have those extra Clif Shot Bloks and Torq gels to keep me going throughout the race.

Compeed blister patches are life-saving little packets of miraculous wonder. I couldn’t have finished the race without them, and without the generosity of Cyril, my motivator on Day 2 who gave me his large-sized ones when he saw the size of my blisters.

The camaraderie, the mutual support, the friendliness and general lack of ego of everyone I met was overwhelming. I mean, literally, overwhelming. I am still reeling from the kindness and inspiration of everyone I met. Examples:

– I had dinner on the second night with a guy in his late 50’s who has done over 200 marathons, more than half of which he does in around 3.5 hours. He’s at the point where he’s been doing an average of one marathon a week for the past 2 years (it took him about 15 years to reach his first 100, and then he just sort of decided to turn it up a notch).  He wasn’t bragging or boasting or saying any of this to impress me, but just because it came up in the conversation at dinner.

– Everyone, no matter how slow or fast, was totally ‘kin’ awesome. If faster people ran past you, they cheered you on for your efforts and got cheers from all of us slower folks. If you ran past slower people, then you did the same for them, cheering them on, joking about the weather or the mud or the hills or the rain or anything else you could think of.

– On the morning of the last day, a guy was hanging out in the breakfast area, asking a couple of us how we were doing and were we ready for the last big push today. He lamented that he wasn’t out there with us today as he had signed up to do this race, but he still wasn’t fully recovered from this year’s Marathon des Sables after he lost all the skin on his feet, but he wanted to be on support crew and cheer us on at the finish line. ‘Kin’ Awesome!

Indeed, it seemed like every other person at this event was either training for the next Marathon des Sables (or MDS as everyone shortened it to), had done one at some point, or was on the waiting list to do one.

It made me feel positively sloth-like. Training for an Ironman just doesn’t seem like such a big deal after this weekend.

Posted by: Robert

Reading Time: 2 minutes

In the Northeast the weather can change in an instant. This time of year temperatures fluctuate +/- 20° F almost daily. Being resistant to bad weather is important in these parts (I see kids in t-shirts at the bus stop in January), being prepared for bad weather is vital.

Mountain Hardwear, a manufacturer of innovative and high quality outerwear and gear, has begun incorporating a heating and charging system into their Radiance and Refugium jackets. Developed over the past several years, the heaters are constructed using stainless steel fibers spun into yarn and sewn into the garments in three strategic locations (one in the back and two in the front) and are reported to work in temperatures 20-30° below freezing and continue to work for up to 8 continuous hours.

In addition to providing heat, the Radiance and Refugium jackets are also equipped to power an array of personal electronic devices, when utilizing the Tech Connector (sold separately for $50). Charge your MP3 player, GPS, lights cellular and satellite phones, etc – all in the front left pocket while simultaneously enjoying the warmth the jacket’s heaters provide.

To power their heated and charge-capable garments, Mountain Hardwear selected the Moshi Power System by Ardica Technologies. Surprisingly unobtrusive, the Ardica system uses a flat, flexible lithium ion battery array that slides into a compartment in the upper back of the jackets. Purchased separately for $145, the Moshi Power System provides power and charging capabilities via a USB cable threaded neatly and discretely from the power source located in the back to the front left pocket. The Moshi battery can be recharged from any standard wall jack and reportedly charges 80% in 1.5 Hours and 100% in 3 hours.

Weighing just 295 grams (~10.5 ounces – about the same as 2 iPhones), the Moshi battery can be pulled from the jacket and used as an on-the-go source for a charge. Fully charged, the Moshi battery can reportedly provide up to 20 charges before needing to be recharged!

All-in-all, the cost of the Radiance or Refugium jackets, with charging capability, is about $425, placing it in the price range of comparative high-end jackets. Wear alone, or under a shell for extraordinary warmth and charge portable electronics on the go!

Posted by: Lawrence

Reading Time: 2 minutes

I’ve taken your standard hand-held Sony camcorder on many hell-runs down steeps or through glades and only broke one camera. This point of view (POV) filming let’s me relive snowboarding in the off season, reminding me of favorite lines… and the one camera I ruined. Was it a rock or a root I hit? I can’t remember, but I do recall that having both hands free when snowboarding is kind of important.

There are helmet and even surfboard-mounted cameras like the GoPro cameras; great, low-cost cameras that capture your personal Jeremy Jones moments in either video or pictures taken at set intervals. If you’re looking to step-up the recording quality and not give up much in the way of size and weight, the VholdR CountourHD1080p is worth looking at.

The ContourHD is easy to use, even with gloves on. Simply slide the record switch forward to record and slide it back to stop. Don’t like to hear your grunts or record your expletives (I’m still talking about snowboard filming here), the CoutourHD can record in silent mode. It uses two lasers to help you line-up your shots when mounting it on a helmet, goggles or handlebars and the battery lasts up to 3 hours.

The CountourHD is spartan when it comes to controls, but I feel this is a positive. The less small or moving parts on a device taken out in the wild, the better. If comes with Easy Edit software that allows you to adjust contrast, exposure, metering and audio gain. I would like to see Easy Edit ported to iPhone or Android, allowing you to make adjustments to changing conditions and light when you’re out-of-bounds and your office is the glade before you.

At just 4.3 ounces the ContourHD can be pre-ordered at vHoldR for $330, making it is as light in the wallet as it is in the hand. Get one and get outside to record your next adventure. VholdR has a good community of users posting their adventures on VholdR.com.

Posted by: Lawrence

Reading Time: 1 minute

Surfing in the Summer is quick and easy; boardies, rash guard and off you go. The only problem is there’s nowhere to stash a key (which in wetsuit season goes behind my calf). Surfers, runners, bikers, anyone who drives somewhere to get a workout has to hide their keys in the wheel well or under a rock and hope both the key and the car are there when they return.

A product called HitchSafe is a 4 digit combination safe that goes in your trailer hitch. It has a drawer that slides out to put your key and other valuables. Some trucks, including those with sliding rear windows can be easy to break into and the HitchSafe provides a safe alternative. The HitchSafe is also a clever place to keep a spare key in the event you lock your keys in the car.

The HitchSafe fits standard 2″ hitch receivers, with the exception of the Toyota Tacoma 2005-07 and 2007 Tundra, both have an extra band of metal around the receiver and require longer bolts. Also some 2005 Toyota Forerunner’s have OEM factory hitches with rounded corners ans require filing off each corner on the HitchSafe for it to fit. A rubber cover goes over the end of the safe to provide a level of protection from the elements and also makes the trailer hitch looks like any other.

The HitchSafe is available on Amazon for $69.95.

Posted by: Lawrence

Reading Time: < 1 minute

While it’s true the main focus of Bitness is fitness gadgets, we do – from time-to-time – write about gadgets for dogs. Most of these gadgets (like this, this and this) border on animal cruelty, but possible none quite so much as the PooTrap…

Source: Geekologie

Reading Time: < 1 minute

We’ve seen some pretty interesting exercise equipment (e.g. this, this and that), but none made me blush quite so much as the Shake Weight.

Using what the manufacturer calls dynamic inertia, the Shake Weight promises a “revolutionary new way to shape arms you’ll love” in just six minutes a day. I’m not sure how they came up with 6 minutes, but it sounds about right (wink, wink).

Check out the video to learn more…

https://www.youtube.com/watch?v=vCPZfdkRTSE

Cost: $19.9USD (includes ‘workout’ DVD), buy one here.

Source: Geekalogie

Reading Time: 3 minutes

In the run-up to the London Triathlon, I had a miserable couple of weeks doing some really crappy work (teaching photography to a bunch of aggressive, violent teenagers) for which I was completely unprepared, getting stressed out, losing sleep, not eating enough, not training much, and generally giving my buddy, Crohn’s Disease, several good reasons to flare up on me. So, dear reader, I must admit that I got to a point, 2 days before the race, where I was ready to drop out, cut my losses, and save my strength for a more important race in September.

But, then I got a good night’s sleep and woke up the next day feeling much better and decided to do the race, but … get this … just for the fun of it.  Yes, I woke up the day before the race and thought, “why don’t you throw away your gadgets and stop-watches and HRMs and forget about the times and Personal Bests – just do the race for the fun of it?”  I know it wasn’t very bitness of me, but deciding to go out there without my stop-watch/HRM and just race for fun lifted a load off my shoulders and turned a race that I had been dreading into a fun day out.

To add to the anti-technology spirit of the day, I realized at the end of the swim section that I had also forgotten to pick up a timing chip at registration (Doh! Major newbie mistake!) and so I wasn’t even going to be listed on the race results when they came out. This fuelled my desire just to go as fast and as hard as I could for as long as I possibly could, until I couldn’t go any more. I broke some rules – I drafted on the bike section (my unimpressive but wonderful TT bike kept up with a much blingier cousin and even gave another guy on a super-fast bike a chance to get on my back wheel for a while). And I rode much, much more aggressively than I had ever ridden in a triathlon before.

As I got back to the transition area for the bike-to-run transition, I had a moment of weakness and picked up my Garmin Forerunner 305 (a gift from an amazing client) and decided that maybe I could just take this wonderful little gadget on the run, just to … you know … gauge my progress, and see how things were going on the run.  I had used the 305 in my previous race and fell in love with the fact that it displayed up-to-the-minute pacing information that is really helpful (e.g. 4:30 per km means you are on target for a 45-minute 10k).  I felt that I had pushed myself so hard on the bike, I wasn’t sure if I would have anything left in my legs for a fast run, and so I turned to the GPS-enabled 305 for a little last-minute guidance in the darker moments of the bike-to-run transition.

Well, I ran my heart out. I just ran as fast and as hard as I thought I could maintain for the full 10k and then I ran a little bit harder than that, for good measure. I felt like I was flying, literally, with a fast cadence and light feet, no aches or pains. Admittedly, the 305 was not always helpful, as there were several parts of the run inside the Excel Centre where there was no satellite signal, but I did get my most transcendent moment of the race from the 305. After one lap, I passed the 5k marker and looked down at the stopwatch and it said 20:00. 20 minutes! I have never run a 20-minute 5k in my entire life and never thought that I would, but on Sunday, the 2nd of August 2009, I did!  And I was so buoyed, so enthused, so amazed, that I just kept on going like the wind and did the full 10k in 39 minutes and 49 seconds (nice little negative split there, too, see that?)!

So, I don’t know how well I did that day (I’m guessing I did better than previous PBs across all 3 disciplines), what my official time was (I’m guessing it was around 2 hours 20 minutes) or where I ranked in my age group. But, thanks to the 305, I know that I ran my best 10k ever, by at least 8 minutes.  And, now the Garmin Forerunner 305 is my favorite gadget.

Posted by: Robert

Reading Time: 2 minutes

For almost a quarter century, Kinetic watches have kept themselves wound by converting movement into energy. As of 2007, over eight million Kinetic watches have been sold and the notion of harvesting energy from movement is becoming even more popular today with a new generation of what are called Nanogenerator devices.

Nanogenerators have the ability to convert mechanical energy into electricity. Tiny nanowires capture and convert body movement into energy that researchers are using to power small electronic devices. The possibilities and applications are many, including “defense technology, environmental monitoring, biomedical sciences and even personal electronics,” says lead researcher Zhong Lin Wang, Regents’ Professor, School of Material Science and Engineering at the Georgia Institute of Technology. (source: ScienceDaily.com).

Several new concept devices and prototypes are being announced, including Tremont Electric’s nPower PEG, Dance Charge and the Cargador De Celular (fancy SPanish-talk for Mobile Charger). Here is a brief look at these three devices, which provide a glimpse of how we may all power our personal gadgets in the near future.

nPower PEG (Personal Energy Generator) harnesses personal kinetic energy as a person walks and transfers it into enough electricity to charge the average portable device up to 80 percent in about an hour. Measuring 9 by 1.5 inches and weighing about 9 ounces, the PEG doesn’t store energy and must be plugged into the device it’s charging. Plug the PEG into your cell phone or GPS, toss it in your backpack and hit the path; The PEG will keep the device constantly charged – essential in emergency situations. The PEG uses USB 2.0 and is compatible with 90 percent of portable electronic devices. Preorder yours now for your next trek into the wilderness.

Worn around your bicep and weighing just over 6 ounces, the Dance Charge uses a system of weights and magnets to produce electric current to store energy in an onboard battery which can later be used to charge small electronic devices. Of all the prototype devices, the Dance Charge seems, in my opinion, the most polished an unobtrusive. Boogie-down to charge-up!

Industrial designer Lola Mensa has an interesting concept device called the Cargador De Celular. The Cargador De Celular appears to slide right over the tongue of your running shoe (which might bother me – especially if only in one shoe). An embedded nanogenerator converts the kinetic energy you generate into power stored in embedded batteries. Flip down the top of the device and attach it to your cell phone, GPS or other gadgets post-run for charging.

Posted by: Lawrence

Reading Time: 3 minutes

Brick training is a concept that is popular in triathlon circles where you combine two different disciplines in one continuous training session. It is a good way of working different muscle groups (e.g. going from a swim straight onto the bike) or preparing yourself for some of the weird physiological sensations you might expect to experience in a race (e.g. going from the bike straight onto the run and your legs might feel quite rubbery).  It is also a really good way to feel like a proper triathlete, walk around muttering to people about “the importance of brick sessions”, and hope they are suitably impressed. In case you were looking for that.

For me, summer is the best time to do this kind of training, because (a) it’s warmer, so it’s not as big a deal to get onto the bike dripping wet; (b) brick training is good, race-specific training that should be done as you get closer to doing your races, usually held in the summer; (c) it can require a lot more time to do such a long session, and so it’s good to have lots of  daylight hours to fit it all in safely.

My big brick sessions this year have involved open water swimming with Swim for Tri, 7:00 – 8:30am on Saturdays (but, I have to admit that I am one of the coaches and rarely swim a full session at anything resembling race pace), then hopping on the bike after the session and riding with a few like-minded folks for 2-4 hours (again, allow me to confess that I religiously stop for hot chocolate and cookies offered up by the fine people at SFT, before getting on the bike).

Over these past few months, I have found a few really simple bits of equipment that have helped me tremendously during these sessions:

– The first one is probably familiar to lots of sports people, the Under Armor long-sleeve crew-neck top, which I have taken to wearing with my cycling bib shorts underneath my wetsuit.  I wear it under the wet suit, because I figure it would be impossible to put on a compression top like that if I were wet. And, incredibly, I have found that the top dries very, very quickly (10-15 minutes) and keeps me warm, wet or dry, the whole time. Given that we have been doing these open water sessions since April, and given that we have not had the balmiest summer weather here in London, this has been a life-saving piece of equipment.

– The second one is perhaps familiar to swimmers out there, the Speedo microfiber towel. It is tiny enough to carry in the back pocket of a cycling jacket or top, but powerful enough to dry off your whole body in a few quick swipes. Then, when you’re dry, squeeze out as much water as you can, fold it up, stick it in your back pocket, and you’re a lot drier and more ready to cycle off into the Essex countryside (past the Secret Nuclear Bunker).

– Finally, I have become a big fan of taking on calories while on the move. These Saturday morning sessions may appear to some of you to be relaxed, undemanding training sessions, what with my cups of hot chocolate and pieces of bread pudding (thank you, again, Mrs. Bullock!). But, when you get up at 4:30am to lead a group who want to ride out for 75 minutes to the swim session at a leisurely 18 mph pace, you learn a lot about getting your nutrition on the bike.  In addition to the bananas and granola bars that I eat on the way out the swim session, I have found that Clif Shot Bloks on the longer rides back give me the perfect combination of carbs, electrolytes, and tasty chewy candy texture that make them soooooo much nicer than gels.

And then we stop for more hot chocolate and cake in Epping Forest (well, I say “we”, but so far, it’s always been my idea, so… you get the idea). So, that’s important, too.

Reading Time: 2 minutes

On most runs I’m wearing a Garmin Forerunner 305 GPS watch with the heart rate receiver strapped around my chest, an armband with my iPhone and on my longer runs, a Fuel Belt around my waist. The hotter it gets and the longer into the running season I go, the more anxious I get with all this gear and I want to go lighter.

In the past, Nike + wasn’t a real option, because first and foremost I’m an Asics man and the foot-pod wasn’t compatible. Secondly, I didn’t like the receiver sticking out from the bottom of my iPod, it wasn’t even compatible with the armband I used. Nike has recently introduced some badly needed updates to their line which I’m excited about because it gives me two options: go light and go even lighter.

Go light
Simply place a Nike + sensor in a Nike + ready shoe or tether it to the laces of your non-Nike shoes with a SwitchEasy Runaway. Next connect with an iPhone 3G, there is no need for an additional receiver since Nike + functionality is now built into the phone. Track distance, calories, pace and time during a run or sync with gym equipment.

This is an advantage over the native Garmin 305, which is susceptible to weak GPS signals from tree canopy or building interference. A separate footpod is available for $75USD, but the Nike + makes a good argument for leaving the GPS at home.

Go even lighter
If you don’t want to lug around the sizable iPhone 3G S, the Nike + works with the iPod Nano and Nike + SportBand. Available July 15th the new Nike + SportBand improves on previous versions by featuring a white background to help information stand-out and a “welded seal to improve water resistance.” When you’re done with a run, simply pop the Nike+ SportBand Link to a USB port on your computer and using the provided Nike+ Utility software.

The Nike + SportBand will be available in a variety of colors including pink/dark grey, yellow/dark grey and red/dark grey and retail for $59USD.

Posted by: Lawrence